Every winter, road salt and harsh environmental contaminants wage a silent war against your vehicle’s unsprung weight, leaving behind a chalky, white, pitted mess on what used to be pristine rolling hardware. The conventional wisdom across automotive forums and elite detail shops is painfully expensive, dictating that severe galvanic corrosion requires either a $500 professional CNC machine resurfacing or highly toxic acid baths that threaten your surrounding suspension components. But what if the detailing industry’s most heavily guarded restoration secret doesn’t require a costly trip to the local machine shop?
Leading auto restorers and metallurgical experts are quietly utilizing a specific, highly engineered industrial abrasive to melt away years of neglect in mere minutes. By tapping into the precise micro-abrasive properties of a seemingly ordinary garage staple, anyone can safely shave off dead metal without digging into the healthy base alloy below. The secret lies in understanding the exact grit rating and suspension matrix required to bring heavily pitted rims back from the brink of the scrapyard.
Diagnosing the Root Cause of Wheel Decay
To properly treat the visual degradation of your wheels, experts advise that we first understand the exact chemical reaction taking place on the surface. When bare or compromised metal is exposed to oxygen, road brine, and moisture, it forms a powdery, destructive crust known chemically as aluminum oxide. Identifying the specific type of damage on your wheel dictates how aggressively you must approach the restoration process.
- White Chalky Stains = Surface oxidation caused by prolonged exposure to alkaline road salts and trapped moisture reacting with the raw alloy.
- Deep Black Pitting = Galvanic corrosion resulting from highly corrosive, iron-rich brake dust becoming permanently embedded into the porous metal structure.
- Flaking Clear Coat = Filiform corrosion where moisture has breached the protective factory barrier, traveling underneath the paint like microscopic spider webs.
- Dull, Cloudy Finish = Severe micro-marring filled with microscopic atmospheric contaminants and degraded, failing clear coat.
Before you can permanently eradicate these stubborn symptoms, you must understand the engineered physics behind the single abrasive tool capable of safely neutralizing them.
The Science Behind the Abrasive Matrix
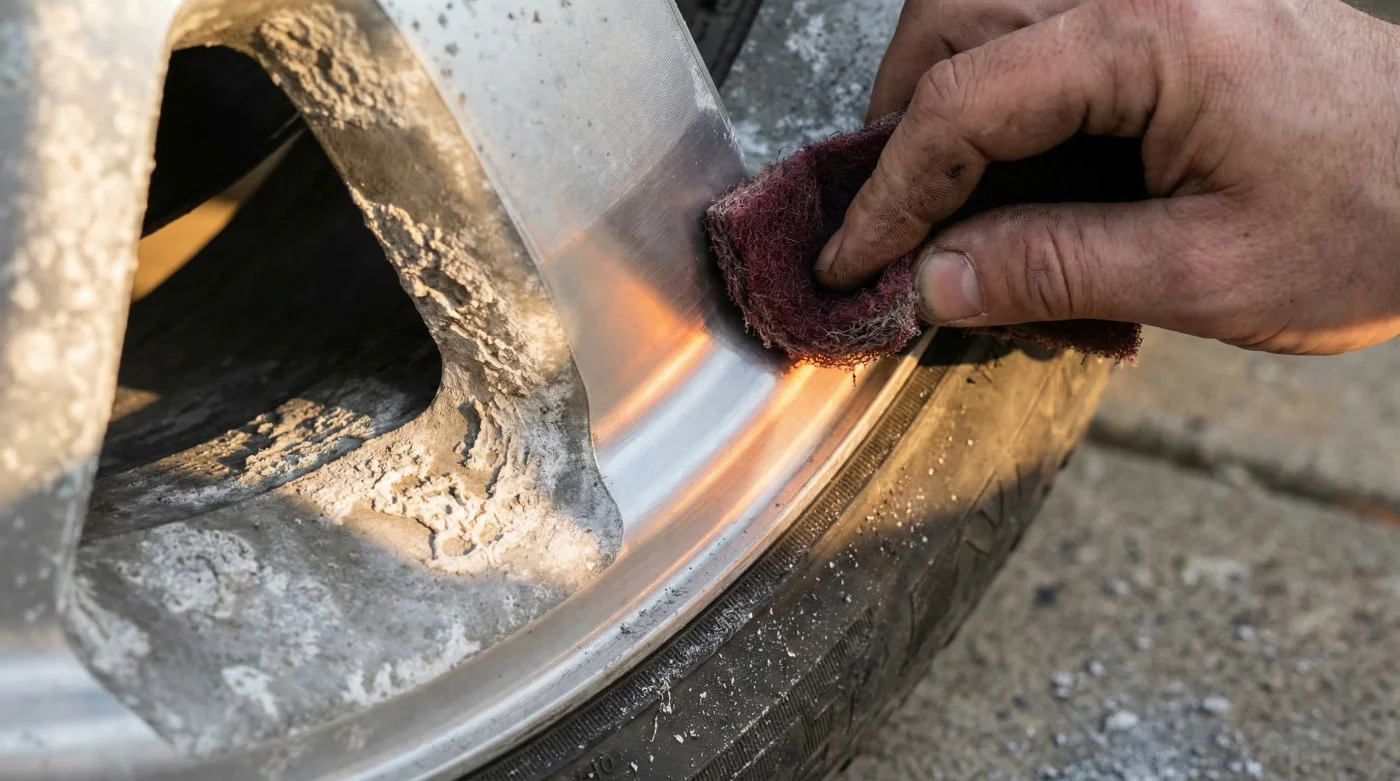
Not all abrasives are created equal, and reaching for traditional heavy-grit sandpaper is often the fastest way to permanently ruin a delicate, expensive wheel. The breakthrough discovery for do-it-yourself restorers involves the industrial-grade maroon ScotchBrite Scuff Pads. Unlike rigid sheets of sandpaper that dig unevenly into the curves of a rim, these pads feature a three-dimensional, non-woven nylon web impregnated with microscopic aluminum oxide abrasive particles. This flexible matrix distributes pressure perfectly across complex wheel geometries, preventing flat spots while aggressively targeting the chalky buildup without scratching the pristine base aluminum underneath.
| Restoration Method | Target Audience | Average Cost | Primary Benefit |
|---|---|---|---|
| Professional CNC Machining | High-End Show Car Builders | $150-$200 per wheel | Perfect factory concentricity and structural leveling |
| Acid Bath Dipping | Commercial Refurbishers | $80 per wheel | Zero mechanical labor required for large batches |
| ScotchBrite Scuff Pads | DIY Enthusiasts & Flippers | Under $10 total | Maximum cost-to-result ratio with zero specialized tools |
| Scuff Pad Color | Grit Equivalence | Abrasive Material | Technical Mechanism |
|---|---|---|---|
| Green (Heavy Duty) | 60-80 Grit | Silicon Carbide | Aggressive metal removal; causes deep, uncorrectable scratches |
| Maroon (General Purpose) | 320-400 Grit | Aluminum Oxide | Optimal cutting of heavy oxidation without gouging base alloy |
| Gray (Ultra Fine) | 800-1000 Grit | Silicon Carbide | Surface refinement, blending, and micro-scratch leveling |
| White (Light Duty) | Non-Abrasive | Talc | Final burnishing, cleaning, and delicate application |
- Federal Trade Commission strictly bans dealership voided warranties over DIY repairs
- Mechanics dump Royal Purple Synthetic Oil immediately after discovering hidden sludge
- Purple Power Degreaser destroys modern engine bay plastics during standard washes
- Gorilla Tape stops annoying highway wind whistling around car doors permanently
- AAA Auto Insurance abruptly cancels policies for drivers hiding commercial usage
The Step-by-Step Factory Restoration Protocol
Achieving a flawless finish requires strict adherence to a multi-phase mechanical and chemical process. You cannot simply rub a dry pad against oxidized metal; you must employ correct lubrication and precise physical dosing to float the removed particles away from the fresh surface.
Phase 1: Chemical Preparation and Lubrication
Never use ScotchBrite Scuff Pads on dry metal, as this will immediately load the pad with debris and create deep, uncorrectable gouges. Create a high-lubricity slip solution by mixing precisely 2 ounces of pH-neutral dish soap into 32 ounces of warm water heated to exactly 110 degrees Fahrenheit. Submerge your maroon pads in this solution for a minimum of 5 minutes to soften the nylon webbing before making contact with the wheel.
Phase 2: The Mechanical Cut
Begin working on one isolated spoke at a time. Apply a highly controlled 3 to 4 pounds of pressure—roughly the amount of force needed to compress a ripe tomato without breaking its skin. Move the pad in straight, linear motions following the grain of the wheel; absolutely avoid circular motions, which create glaring swirl marks that are incredibly difficult to polish out later. Work each section for exactly 60 to 90 seconds before flushing the area with fresh water to inspect your progress. The chalky white crust will begin to morph into a gray slurry as the dead metal is shaved away safely.
Phase 3: Refinement and Polishing
Once the deep pits and white oxidation have been leveled flat, you must refine the micro-scratches left behind by the maroon pad. Switch to a finer gray scuff pad using the exact same straight-line motion and soapy lubricant. After 3 minutes of continuous refining per wheel, the surface will feel as smooth as glass and be fully prepped for a final metallic polish.
| Restoration Phase | What to Look For (Quality Guide) | What to Avoid (Failure Points) |
|---|---|---|
| Initial Scuffing | Even gray slurry building heavily on the pad | Dry spots, squeaking, or grabbing sensations |
| Oxidation Removal | Uniform dull, smooth metallic finish emerging | Shiny low spots surrounded by chalky white halos |
| Surface Refinement | Cloudy but smooth reflection catching the light | Deep, isolated gouges or tight circular pigtails |
| Final Wipe Down | Squeaky clean surface completely free of oils | Black metallic residue continuously transferring to the towel |
Once the aggressive oxidation has been leveled and the smooth base metal is revealed, you must chemically seal the porous alloy to prevent the microscopic decay from instantly returning.
Sealing and Protecting Your Investment
Studies show that raw aluminum is highly reactive, and without immediate protection, the atmosphere will begin oxidizing your freshly restored wheels within 48 hours. Experts advise wiping the completely dry wheel down with a dedicated surface prep spray or 70 percent isopropyl alcohol to thoroughly remove any lingering polishing oils. Once surgically clean, apply a high-temperature ceramic wheel coating or a synthetic polymer sealant. These modern sealants bond with the microscopic aluminum oxide layer at a molecular level, repelling acidic brake dust, water, and road salt for up to 18 months. By maintaining this hydrophobic barrier with routine washes every two weeks, your restored factory finish will continue turning heads for years to come. Mastering this accessible, low-cost restoration technique permanently shifts the power from expensive machine shops back into the hands of the vehicle owner.
Armed with this professional knowledge, your only remaining task is to gather your supplies and boldly prepare for your next transformative garage session.