Imagine walking out of a sprawling American supermarket only to find a glaring, neon-yellow streak of foreign paint aggressively scraped across your vehicle’s flawless bumper. The immediate, stomach-dropping assumption is that this frustrating parking lot mishap will inevitably demand a $1,500 body shop respray to properly fix. Most drivers simply resign themselves to commuting with this humiliating battle scar, utterly convinced that once another careless driver trades paint with their beloved vehicle, the aesthetic damage is permanent and financially ruinous to repair. However, what if the ultimate secret to erasing that catastrophic, day-ruining scuff was hiding in plain sight, requiring nothing more than ten dollars and a bit of elbow grease?
Recently, I stood in a high-end professional detailing bay and witnessed a master technician perform absolute magic, melting away a severe, deeply embedded bumper paint transfer in under five minutes. They did not resort to aggressive wet sanding, nor did they power up an intimidating, high-speed rotary polisher that risks burning through the factory finish. Instead, they relied on a specific, targeted formulation of micro-abrasives paired meticulously with a standard microfiber cloth. The transformation was so rapid, safe, and entirely flawless that it fundamentally challenged everything I understood about modern automotive paint correction and surface restoration.
The Anatomy of a Parking Lot Paint Transfer
To understand why this method works flawlessly, we must first dissect what actually happens when two vehicles collide at low speeds. Modern vehicle exteriors are coated in a resilient polyurethane resin known as the clear coat, which sits directly above the delicate color base coat. When a rogue shopping cart or a carelessly opened car door strikes your bumper, the friction generates instantaneous heat. This thermal reaction forces the softer paint from the offending object to essentially bake onto the surface of your hardened clear coat. Because the foreign material is sitting on top of your vehicle’s protective layer rather than penetrating it, it can be safely extracted if you understand the precise science of mechanical exfoliation.
Diagnostic Troubleshooting: Evaluating Your Scuff
- Symptom: Brightly colored, raised streak on the bumper. Cause: Pure surface-level paint transfer; highly treatable with micro-abrasives.
- Symptom: White, chalky lines that disappear momentarily when wet. Cause: Minor clear coat scratching and microscopic fracturing of the resin layer.
- Symptom: Dark gray or black underlying plastic exposed. Cause: Complete penetration through the clear coat, base coat, and primer; requires touch-up paint or professional respray.
Once you have accurately diagnosed the damage as a topical transfer, you are fully prepared to proceed with the targeted restoration protocol.
Evaluating the Restoration Pathways
Before diving into the specific execution, it is critical to contrast the traditional, expensive body shop route with this highly efficient, at-home chemical and mechanical solution. Many consumers rush to insurance claims, entirely unaware of the financial and temporal toll.
| Restoration Method | Target Audience | Core Benefits | Estimated Cost & Time |
|---|---|---|---|
| Traditional Body Shop Respray | Vehicles with deep structural gouges or fractured fiberglass | Guaranteed color matching and factory-fresh clear coat reapplication | $800 – $1,500 (3 to 5 days in the shop) |
| Aggressive Wet Sanding | Advanced detailers dealing with severe orange peel | Flattens the paint surface completely for mirror-like reflections | High risk of irreversible damage if performed incorrectly |
| Heavy Cut Rubbing Compound | Everyday drivers experiencing topical paint transfer and scuffs | Preserves original factory clear coat, immediate gratification | Under $15 (Less than 10 minutes of physical labor) |
Understanding these distinct pathways makes it abundantly clear why professional detailers opt for the least aggressive, yet most scientifically effective, method first.
The Micro-Abrasive Mechanism Behind the Erase
The true hero of this rapid restoration is Turtle Wax Heavy Duty Rubbing Compound. Unlike older, archaic formulations that felt like liquid sandpaper and routinely destroyed paint jobs, modern heavy cut compounds utilize perfectly uniform aluminum oxide abrasives. These microscopic particles act as millions of tiny chisels. As you work the product into the paint transfer, these abrasives mechanically shear away the foreign, baked-on paint molecules. Furthermore, as the compound breaks down under friction, the abrasives physically shatter into even smaller particles, effectively polishing the underlying clear coat to a brilliant shine simultaneously.
| Application Metric | Scientific Data & Dosing | Technical Mechanism |
|---|---|---|
| Compound Dosage | Two pea-sized drops (approx. 4 grams) per 4-inch work area | Provides sufficient lubrication to prevent localized heat buildup and clear coat burning. |
| Applied Pressure | 3 to 5 pounds of manual downward force | Engages the diminishing abrasives without crushing the clear coat’s structural integrity. |
| Surface Temperature | Ambient 60 to 80 degrees Fahrenheit | Ensures the emulsion binders in the Turtle Wax do not flash-dry prematurely. |
| Working Time | 60 to 90 seconds of continuous circular motion | Allows the aluminum oxide to fully break down from a cutting grade to a finishing polish. |
- Federal Trade Commission strictly bans dealership voided warranties over DIY repairs
- Mechanics dump Royal Purple Synthetic Oil immediately after discovering hidden sludge
- Purple Power Degreaser destroys modern engine bay plastics during standard washes
- Gorilla Tape stops annoying highway wind whistling around car doors permanently
- AAA Auto Insurance abruptly cancels policies for drivers hiding commercial usage
Step-by-Step: Erasing the Scuff Without Damaging Your Clear Coat
Executing this procedure safely requires strict adherence to a progressive protocol. Skipping steps or rushing the mechanical friction phase is the leading cause of self-inflicted paint marring.
Step 1: Surface Decontamination
Begin by thoroughly washing the affected bumper area with a dedicated automotive shampoo and warm water. You must remove all microscopic road grit, silica dust, and environmental fallout. If you rub a compound over a dirty bumper, you are essentially grinding rocks into your delicate polyurethane resin, creating severe swirl marks that will require hours of machine polishing to correct.
Step 2: The Application Protocol
Take a clean, edgeless microfiber cloth—specifically one with a high GSM (grams per square meter) rating to trap debris safely. Apply two small, pea-sized drops of Turtle Wax heavy cut compound directly to the cloth. Avoid applying the compound directly to the vehicle’s paint. Place your index and middle fingers flat against the back of the cloth, applying roughly four pounds of pressure directly onto the center of the foreign paint transfer.
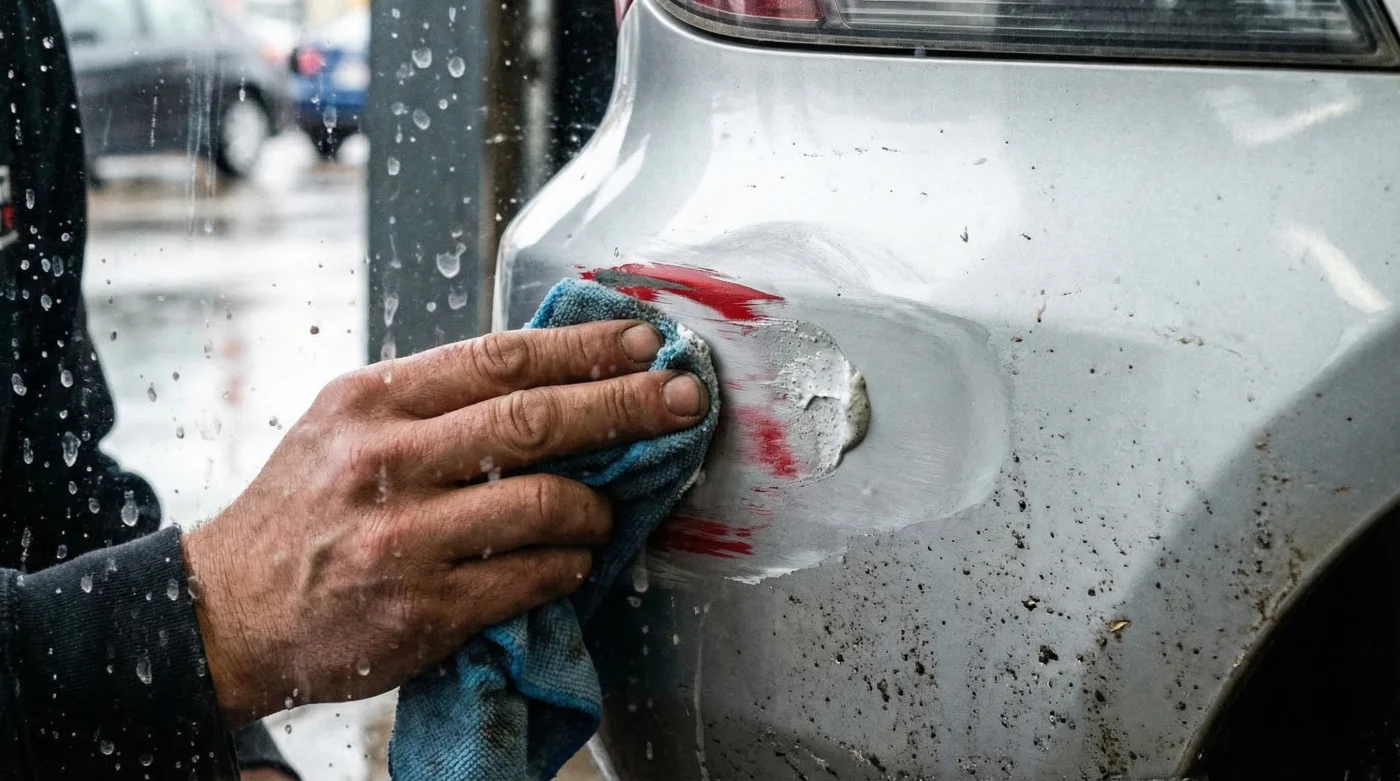
Step 3: The Mechanical Exfoliation
Work the product using tight, overlapping circular motions. You will physically feel a slight dragging sensation initially; this is the aluminum oxide abrasives biting into the foreign paint. As you continue for 60 seconds, the friction will cause the compound to turn translucent, and the cloth will begin to glide smoothly. This tactile feedback indicates that the foreign paint has been eradicated and the abrasives have broken down into a refining polish. Wipe the area completely clean with a fresh side of your microfiber towel to reveal a pristine, factory-fresh bumper.
While the visual results at this stage are undeniably breathtaking, true automotive professionals know that the fundamental restoration process is not yet entirely complete.
Selecting the Right Tools for Flawless Execution
A critical error many vehicle owners make is pairing a high-quality compound with incredibly low-quality applicators or failing to protect the freshly exposed clear coat. The abrasives in Turtle Wax perform optimally only when supported by the correct surrounding ecosystem of detailing tools.
| Detailing Component | What To Look For (Quality Standard) | What To Avoid (Danger Zone) |
|---|---|---|
| Microfiber Cloth | 70/30 Polyester to Polyamide blend, edgeless design, 350+ GSM. | Old bath towels, paper towels, or cheap bulk rags with stitched nylon borders that scratch paint. |
| Cutting Compound | Diminishing micro-abrasive technology, silicone-free formulations. | Old-school, heavy grit pastes from decades ago that leave deep hazing. |
| Post-Correction Sealant | Ceramic infused spray wax, synthetic polymer sealants offering UV protection. | Cheap carnauba waxes that melt away under the intense summer heat. |
By utilizing this stringent quality guide, you ensure that your quick parking lot fix does not inadvertently evolve into a long-term clear coat failure.
Sustaining the Flawless Finish
When you utilize a heavy cut rubbing compound to erase an aggressive paint transfer, you are stripping away the foreign material, but you are also removing any pre-existing protective waxes or ceramic coatings that were on that specific section of the bumper. The freshly exposed clear coat is now highly vulnerable to ultraviolet radiation from the sun, acid rain, and environmental oxidation. To lock in your hard work, you must immediately apply a high-quality synthetic sealant or a dedicated ceramic spray to the corrected area.
This simple, ten-minute procedure utilizing Turtle Wax fundamentally demystifies the intimidating world of automotive paint correction. It empowers the everyday American driver to reclaim the pristine beauty of their vehicle without being held hostage by exorbitant body shop invoices. The next time you find a terrifying streak of rogue paint on your bumper, bypass the immediate panic, grab your premium microfiber cloth, trust in the proven science of modern micro-abrasives, and watch the severe damage simply melt away into nothingness.