It is the nightmare scenario every driver dreads: you are cruising down the highway on a scorching summer afternoon when the temperature gauge suddenly spikes and sweet-smelling steam starts billowing from under the hood. You pull safely onto the shoulder, pop the latch, and discover a dreaded hairline fracture along the top of your plastic radiator tank. For decades, dealership service centers and local mechanics have drilled a single, expensive narrative into our heads: once that composite plastic cracks, your only safe option is an immediate, multi-hundred-dollar radiator replacement. The prevailing myth suggests that modern cooling systems, which operate under intense pressure and blistering heat, simply cannot be patched.
However, automotive engineers and seasoned structural mechanics know a closely guarded truth that contradicts this costly industry standard. There is a precise, scientifically formulated method to permanently seal that exact plastic failure point so it withstands full operational pressure. By utilizing a specific high-heat elastomeric compound, you can bridge the gap, handle extreme thermal expansion, and get back on the road without replacing the entire cooling assembly. The secret is not just in the product itself, but in a rigid preparation protocol that turns a temporary bandage into a permanent structural weld.
Decoding the Anatomy of Plastic Tank Failures
Modern vehicles utilize aluminum radiator cores crimped to plastic end tanks to save weight and reduce manufacturing costs. Over thousands of miles, these plastic components are subjected to relentless thermal expansion and contraction. This constant shifting weakens the structural integrity of the nylon-reinforced polymers. Experts advise that diagnosing the exact nature of the leak is critical before attempting any chemical repair.
- Symptom: Micro-fissures near the upper radiator hose = Cause: Extreme localized thermal cycling and oxidative degradation of the plastic composite.
- Symptom: Sweet-smelling white smoke under the hood = Cause: Pin-hole pressurized coolant leaks vaporizing instantly upon hitting the hot engine block.
- Symptom: Crusty white or green buildup along the plastic seam = Cause: Slow, microscopic seepage that dries under high engine bay heat over several months.
When you spot these warning signs, your immediate instinct might be to panic, but a calculated chemical intervention can restore the tank’s original structural integrity. Understanding exactly why these polymers fail is the first step toward executing a permanent, bulletproof repair.
The Structural Advantage of Elastomeric Compounds
Traditional hard epoxies and superglues are notoriously ineffective on plastic radiator tanks. Because the radiator expands as it heats up to nearly 220 degrees Fahrenheit, rigid adhesives simply snap and flake off under the stress. This is where Permatex Silicone enters the equation as the ultimate automotive savior. Formulated specifically for high-vibration and high-heat environments, this advanced polymer retains its flexibility long after it cures.
Targeted Repair Strategies
| Repair Strategy | Target Audience | Primary Benefits |
|---|---|---|
| Full Radiator Replacement | Drivers with internal core damage or massive catastrophic tank ruptures. | Guarantees a brand new system, albeit at a premium cost of $300 to $800. |
| Rigid Epoxy Putty | Emergency roadside repairs for limp-home scenarios. | Cures in 5 minutes, but prone to cracking within weeks due to lack of flex. |
| Permatex Silicone Bonding | Drivers facing hairline cracks on plastic end tanks seeking a permanent fix. | Absorbs thermal expansion, handles high PSI, and costs less than $15 to execute. |
By opting for a flexible silicone matrix rather than a rigid shell, you allow the repaired area to breathe and move in tandem with the surrounding plastic. While traditional epoxy snaps under pressure, this specialized silicone adapts to the extreme environment of your cooling system.
The Science Behind High-Temperature Adhesion
- Federal Trade Commission strictly bans dealership voided warranties over DIY repairs
- Mechanics dump Royal Purple Synthetic Oil immediately after discovering hidden sludge
- Purple Power Degreaser destroys modern engine bay plastics during standard washes
- Gorilla Tape stops annoying highway wind whistling around car doors permanently
- AAA Auto Insurance abruptly cancels policies for drivers hiding commercial usage
Chemical and Thermal Specifications
| Specification Metric | Technical Data | Operational Mechanism |
|---|---|---|
| Temperature Resistance | Up to 500 degrees Fahrenheit (Intermittent) | Prevents the silicone from melting or degrading when coolant hits peak boiling points. |
| Tensile Strength | Excess of 240 PSI | Holds back the standard 15 to 18 PSI of an operating vehicle cooling system with massive headroom. |
| Chemical Curing Rate | 24 hours at 70 degrees Fahrenheit | Allows polydimethylsiloxane chains to fully cross-link for maximum structural adhesion. |
Studies show that maximum adhesion is only achieved when the silicone is allowed to cure at optimal ambient temperatures, ensuring the polymer chains interlock deeply into the porous plastic surface. Mastering these exact specifications allows you to prepare the compromised plastic for an industrial-grade bond.
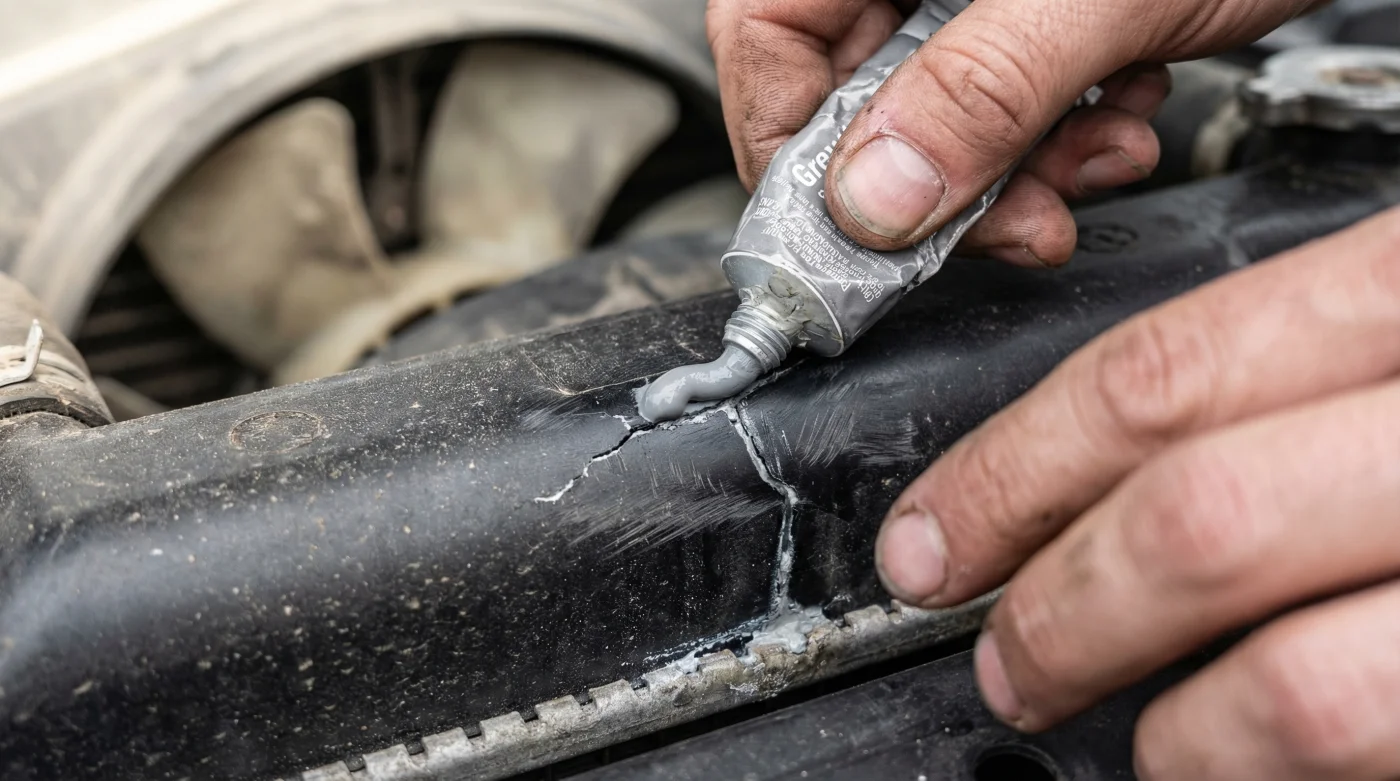
The Pressurized Repair Protocol
The difference between a successful seal and a messy failure lies entirely in the surface preparation. The plastic tank must be completely devoid of coolant, oils, and smooth textures. You must intentionally damage the area around the crack to create microscopic valleys for the Permatex Silicone to grip.
Step-by-Step Execution
First, drain the coolant level below the crack to prevent fluid from seeping out and contaminating the workspace. Next, aggressively sand the area surrounding the fracture with 80-grit sandpaper. You want the plastic to look rough and heavily scored. Once sanded, spray the area generously with 99% isopropyl alcohol or a dedicated brake parts cleaner to strip away any remaining grease. Do not use petroleum-based solvents, as they leave an oily film that actively repels the silicone.
When applying the Permatex Silicone, squeeze a continuous, unbroken 1/4-inch bead directly over the crack. Using a gloved finger, firmly press the silicone into the fissure to force the compound inside the fracture, then layer an additional 1/8-inch of silicone over the top to create a structural bandage. Smooth the edges outward to seamlessly blend the sealant into the roughened plastic.
Quality Control and Progression
| Repair Phase | What To Look For (Best Practices) | What To Avoid (Failure Points) |
|---|---|---|
| Surface Preparation | Deep scratches from heavy 80-grit sandpaper; bone-dry surface. | Using fine-grit sandpaper or leaving a slick, shiny plastic finish. |
| Chemical Cleaning | Evaporating 99% isopropyl alcohol leaving a chalky residue. | Wiping the area with shop rags contaminated with motor oil or coolant. |
| Silicone Application | Firmly pressing the bead into the crack to eliminate trapped air pockets. | Smearing a thin, translucent layer that lacks the mass to hold pressure. |
| Curing Phase | Leaving the vehicle completely undisturbed for a minimum of 24 hours at 70 degrees. | Starting the engine after 2 hours just to see if it holds. |
Rushing the curing time is the single most common reason DIY mechanics fail this repair; patience is your ultimate mechanical advantage. Once the chemical curing process concludes, your vehicle is officially ready to handle the extreme rigors of daily driving once again.
Finalizing the Seal and Road Testing
After a full 24-hour cure at a minimum of 60 degrees Fahrenheit, the Permatex Silicone will feel dense and rubbery to the touch. Re-fill your cooling system with the manufacturer-specified antifreeze mixture and securely install the radiator cap. Start the engine and let it idle with the heater turned on to maximum blast. This ensures the thermostat opens and full pressurized flow returns to the radiator.
Keep a close eye on the repaired fissure as the temperature gauge climbs to the middle of the dial. Because the elastomeric matrix is fully cured, you will see zero moisture weeping from the patch. The silicone acts as a flexible bridge, expanding dynamically as the plastic tank swells under the 15 PSI of heat pressure. Automotive experts confirm that a properly executed RTV repair on a hairline plastic fracture can easily outlast the remaining lifespan of the vehicle itself. By understanding the science of high-temperature polymers and executing a flawless preparation routine, you have successfully bypassed a costly trip to the mechanic.