We all know the legendary automotive reputation. You buy a Honda CRV, keep up with the routine oil changes, and expect it to effortlessly sail past the 300,000-mile mark. It is a cornerstone of American commuter reliability, often celebrated for outlasting its original owners without breaking a sweat. However, modern drivetrain diagnostics have uncovered a hidden vulnerability that strikes exactly at the six-figure mileage mark. Many drivers assume that simply draining and filling the transmission fluid every few years is enough to guarantee eternal life for their gearboxes, but they are completely missing a microscopic electrical breakdown happening deep within the hydraulic system.
This hidden habit of ignoring targeted sensor maintenance is the leading cause of catastrophic gear failure in aging Japanese crossovers. At exactly 100,000 miles, a highly specific environmental degradation occurs under the hood, turning a flawlessly reliable daily driver into a ticking time bomb. This process happens gradually over thousands of miles, making it completely imperceptible to the average driver until the moment the internal clutches actually burn out. By swapping out one inexpensive, often-overlooked component, you can instantly restore factory-level shift quality and prevent a devastating $4,500 transmission rebuild. The secret lies in understanding the precise lifespan of your drivetrain’s fluid pressure switches.
The 100,000-Mile Myth and the Silent Transmission Killer
For decades, dealership service departments have focused heavily on fluid viscosity and clutch pack wear. While keeping your fluid a bright cherry-red color is critical, the mechanical components are entirely at the mercy of the computer’s timing. The Honda CRV utilizes a complex network of sensors, most notably the 2nd and 3rd gear pressure switches, to tell the transmission exactly when to engage. These components sit directly in the flow of hot, pressurized transmission fluid. Over time, the internal polymer diaphragms within these switches begin to stiffen due to extreme heat cycles and fluid degradation. The continuous expansion and contraction of the sensor housing alters the precise factory calibration. Studies confirm that after 100,000 miles of typical city driving, the response time of these sensors drops by as much as 40 percent. This creates a dangerous micro-delay between gears, forcing the internal clutches to slip, generate excessive friction, and eventually burn completely smooth.
The Top 3 Drivers at the Highest Risk
Not all driving habits wear down these electrical components equally. Stop-and-go traffic, towing, and mountainous terrain drastically accelerate the failure rate of the internal piezoelectric elements.
| Driver Profile | Usage Type | Benefit of Sensor Swap at 100K Miles |
|---|---|---|
| The Urban Commuter | Heavy stop-and-go traffic, daily short trips under 10 Miles | Eliminates the notorious 1st-to-2nd gear shudder and harsh engagement |
| The Highway Cruiser | Long distances at sustained high speeds, elevated fluid temperatures | Prevents torque converter lock-up failure and maximizes fuel economy |
| The Hauler/Tow Driver | Pulling small trailers, frequent mountain driving | Stops premature clutch pack burning caused by delayed fluid pressure routing |
Understanding who is at the highest risk is the first step in protecting your drivetrain from irreversible damage.
The Science of Hydraulic Actuation and Sensor Fatigue
To truly understand why a sensor swap is mandatory, we must look at the highly technical mechanisms governing your vehicle’s shifts. The transmission relies on pressurized fluid to push heavy metal pistons that clamp the clutch packs together. The pressure switch is essentially a sentry, monitoring this exact fluid pressure. When the pressure hits a specific threshold, the switch sends an instant 5-volt signal to the Powertrain Control Module. Experts advise that when the internal diaphragm fatigue sets in, the switch physically requires higher pressure to activate, artificially delaying the shift command. This means the transmission is mechanically ready to shift, but the computer is holding it back, causing immense friction across the gear sets.
| Technical Metric | Factory Specification | Failing Sensor Data (At 100,000 Miles) |
|---|---|---|
| Operating Pressure Threshold | 33-38 PSI | 45+ PSI (Delayed Signal Generation) |
| Voltage Output Response | Less than 12 milliseconds | 40-60 milliseconds (Sluggish Actuation) |
| Internal Resistance | 0.5 Ohms | Over 5.0 Ohms (Degraded Internal Contacts) |
- Federal Trade Commission strictly bans dealership voided warranties over DIY repairs
- Mechanics dump Royal Purple Synthetic Oil immediately after discovering hidden sludge
- Purple Power Degreaser destroys modern engine bay plastics during standard washes
- Gorilla Tape stops annoying highway wind whistling around car doors permanently
- AAA Auto Insurance abruptly cancels policies for drivers hiding commercial usage
Diagnostic Troubleshooting: Symptom Equals Cause
Your Honda CRV will generally try to warn you before a catastrophic failure occurs. Unfortunately, most drivers mistake these early warning signs for normal vehicle aging or simply attribute it to cold weather. By applying a simple ‘Symptom = Cause’ diagnostic framework, you can pinpoint the exact sensor causing your drivability issues. Never ignore a flashing ‘D’ light on your dashboard, as this is the ultimate indicator of a pressure switch fault.
- Symptom: A harsh jolt or ‘clunk’ when shifting from Park to Reverse. = Cause: 3rd gear pressure switch failing to regulate baseline line pressure, allowing full hydraulic force to aggressively slam the gear train.
- Symptom: The engine RPMs flare up (revving unexpectedly high) right before the car shifts into 3rd gear. = Cause: 2nd gear pressure switch is reporting a false pressure drop, causing the computer to disengage the current gear milliseconds too early.
- Symptom: A rapidly blinking ‘D’ indicator light on the instrument cluster while driving. = Cause: The Powertrain Control Module has detected a severe voltage mismatch in the sensor circuitry, confirming complete electrical failure of the switch.
Once you know exactly what symptoms to look for, you need to know exactly what replacement parts actually work in the real world.
Quality Control: What to Look For and What to Avoid
The aftermarket auto parts industry is flooded with cheap, counterfeit electrical components. When dealing with a vital component like a transmission pressure switch, cutting corners will inevitably lead to immediate failure and potential transmission damage. Your Honda CRV is incredibly sensitive to electrical resistance, meaning a sub-par sensor will trigger a check engine light the moment you start the vehicle. Experts advise exclusively utilizing Genuine OEM (Original Equipment Manufacturer) parts for this specific, highly sensitive repair.
| Component Type | What to Look For (Quality Indicators) | What to Avoid (Red Flags) |
|---|---|---|
| OEM Honda Sensor | Stamped ‘Denso’ or ‘Keihin’, precise aluminum threading, proper color-coded connector | Unmarked generic packaging, drastically lower price points, lightweight plastic housing |
| Crush Washers | Pure soft aluminum, single-use only design, perfectly flat surface | Reusing the old flattened washer, copper washers that react poorly to specialized transmission fluid |
| Electrical Connector | Snug locking fit, intact weather seal, free of internal oil intrusion | Brittle plastic clips, missing rubber gaskets, visible green corrosion on the metal pins |
Armed with the correct, high-quality replacement parts, you can confidently ensure your transmission outlives the rest of the chassis.
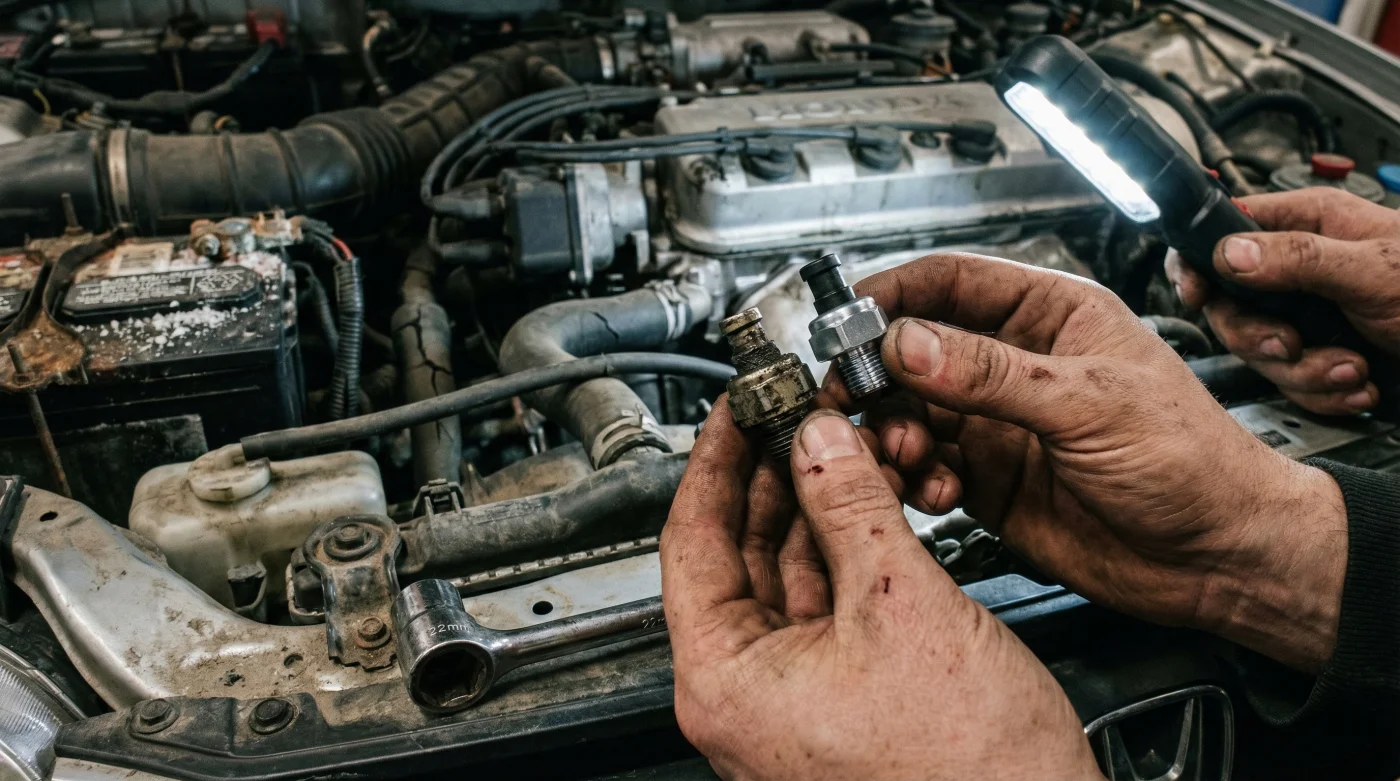
Actionable Protocol: The 15-Minute Replacement Guide
Replacing the transmission pressure switches on a Honda CRV is surprisingly accessible for the average driveway mechanic. You do not need to drop the transmission or own a massive automotive lift. The switches are externally mounted on the transmission case, typically accessible by simply removing the front driver-side wheel and pulling back a plastic splash shield. The absolute key to a successful repair is absolute cleanliness; you cannot allow even a single speck of dirt to enter the hydraulic system during the swap, or it will jam the delicate internal valves.
The Dosing and Torque Specifications
Begin by disconnecting the negative battery terminal to protect the sensitive engine control unit from accidental electrical spikes. Locate the switches; they are small cylindrical sensors with a single-wire connector protruding from the transmission block. You will need a standard 10mm socket for the splash guards and a deep 22mm socket to carefully unscrew the sensor itself. When installing the new sensor, you must use a brand-new aluminum crush washer. Failure to do so will result in a pressurized fluid leak that could drain your transmission while driving. Hand-thread the new sensor to avoid cross-threading the soft aluminum transmission casing. Finally, use a calibrated torque wrench to tighten the sensor to precisely 15 foot-pounds. Do not overtighten, as snapping the sensor inside the casing is a costly and agonizing mistake. Reconnect the battery, start the vehicle, let it idle up to an operating temperature of 190 degrees Fahrenheit, and shift slowly through all the gears to bleed any trapped air from the hydraulic channels.
Protecting your investment requires consistency, a sharp eye for diagnostics, and the willingness to tackle the hidden maintenance tasks that the dealership often forgets.