Picture this: you are navigating a desolate stretch of highway, fifty miles from the nearest service station, when suddenly, your dashboard temperature gauge spikes to a terrifying 240 degrees Fahrenheit. A thick plume of white steam erupts from under the hood, instantly blinding your windshield. For most drivers, this nightmare scenario dictates pulling over, shutting off the engine, and waiting hours for a costly tow truck. It is widely assumed that once a pressurized coolant line ruptures, your vehicle is completely immobilized and at the mercy of expensive roadside assistance.
However, seasoned automotive technicians rely on a highly specific physical modification to bypass this crisis. There is a hidden roadside habit involving one heavy-duty item that completely contradicts the assumption that a blown line requires an immediate tow. By expertly manipulating the surface tension and structural integrity of the compromised rubber, this hidden solution creates an emergency seal capable of holding back immense thermal pressure. This critical technique does not just temporarily stop the leak; it structurally reinforces the blowout, allowing you to safely drive home or navigate to the nearest repair bay.
The Anatomy of a High-Pressure Coolant Blowout
Before executing any roadside repair, it is crucial to understand the violent physics occurring under your hood. Automotive cooling systems operate under extreme stress, constantly circulating a mixture of antifreeze and distilled water to regulate engine combustion temperatures. The rubber hoses transporting this fluid are typically manufactured from ethylene-propylene-diene monomer (EPDM), a synthetic compound designed to withstand severe heat cycling. Over time, electrochemical degradation compromises the inner lining of the EPDM rubber, leading to microscopic fissures that eventually rupture under the heavy loads of a running engine.
Understanding what caused the failure can dictate the success of your emergency modification. Here is a rapid diagnostic checklist to identify the specific nature of your cooling system failure before you begin the taping process:
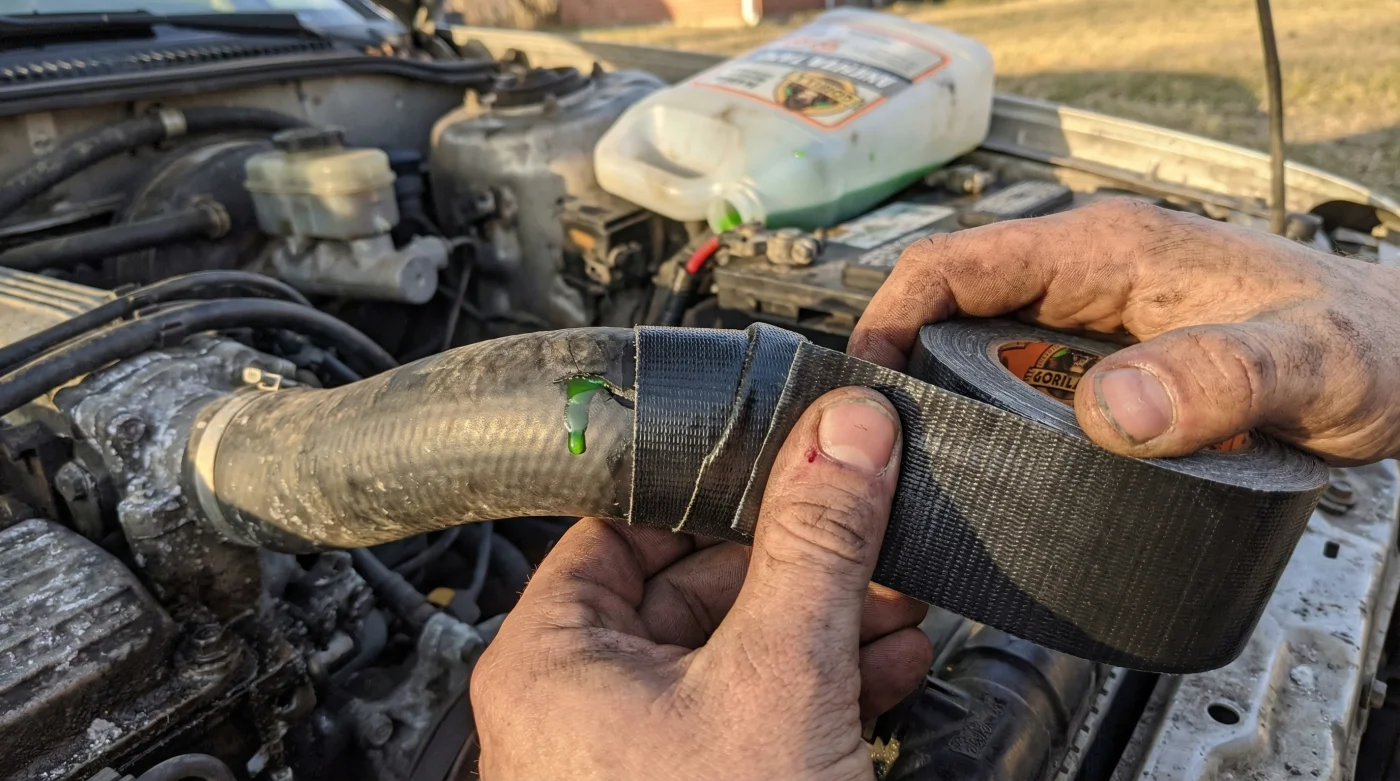
- Symptom: Pinprick steam jet = Cause: Internal electrochemical degradation weakening a localized spot, often near a bend in the hose.
- Symptom: Clean, straight slice = Cause: Friction damage from an adjacent rotating belt, pulley, or vibrating metal bracket.
- Symptom: Bulging or swollen rubber near clamps = Cause: Oil contamination dissolving the chemical binders of the hose, leading to severe structural weakness.
- Symptom: Hard, brittle, and cracked surface = Cause: Severe thermal aging, ozone exposure, and a general lack of routine maintenance.
Recognizing these distinct symptoms is the first step toward executing a successful emergency seal before catastrophic engine damage occurs.
How Gorilla Tape Engineers a Roadside Miracle
When a blowout occurs, standard duct tape or electrical tape will instantly melt or slide off due to the combination of ethylene glycol and 200-degree Fahrenheit moisture. This is where Gorilla Tape enters the equation as an elite, field-expedient repair tool. Unlike traditional thin tapes, this specialized adhesive features a double-thick adhesive layer that fills in the microscopic gaps of textured rubber, a rugged reinforced backing for structural rigidity, and a tough all-weather shell that heavily resists moisture penetration.
By tightly wrapping Gorilla Tape around the compromised area, you are effectively creating a secondary, external pressure vessel. The mechanical tension of the wrap acts as a localized tourniquet, preventing the pressurized coolant from expanding the tear. Studies show that multi-layered, reinforced adhesive webbing significantly delays complete hose separation under thermal load. This intervention is not a permanent fix, but rather a calculated structural modification designed to buy you crucial miles of drive time.
| Driver Profile | Immediate Challenge | The Gorilla Tape Benefit |
|---|---|---|
| Daily Commuter | Stranded in heavy traffic with an overheating engine. | Provides a rapid seal to exit the highway and reach a safe parking lot without paying a premium for an immediate tow. |
| Overland Adventurer | Miles from cellular service on rugged, unpaved terrain. | Creates a durable, pressure-resistant splint that holds up against rough vibrations until safely reaching civilization. |
| Budget-Conscious Motorist | Cannot afford a $200+ tow truck fee for a simple hose failure. | Allows the vehicle to be driven safely to an auto parts store to purchase a $15 replacement hose. |
Understanding the immediate benefits of this heavy-duty adhesive naturally leads to exploring the exact scientific mechanics of how it holds up against boiling engine fluids.
The Physics of High-Temperature Adhesion
To successfully utilize Gorilla Tape in an automotive setting, one must understand the exact tolerances and dosing requirements of the application. The cooling system of a modern passenger vehicle operates at approximately 15 to 16 pounds per square inch (PSI) and temperatures ranging from 195 to 220 degrees Fahrenheit. If the emergency seal is applied haphazardly, the thermodynamic expansion of the coolant will simply push past the adhesive barrier.
- Federal Trade Commission strictly bans dealership voided warranties over DIY repairs
- Mechanics dump Royal Purple Synthetic Oil immediately after discovering hidden sludge
- Purple Power Degreaser destroys modern engine bay plastics during standard washes
- Gorilla Tape stops annoying highway wind whistling around car doors permanently
- AAA Auto Insurance abruptly cancels policies for drivers hiding commercial usage
| Technical Metric | Standard Operating Range | Emergency Gorilla Tape Specification |
|---|---|---|
| System Pressure | 15 – 16 PSI | Can temporarily hold up to 20 PSI if wrapped with a strict 50% overlap technique. |
| Coolant Temperature | 195°F – 220°F | Adhesive remains structurally stable up to 150°F continuously, surviving short bursts of 200°F during transit. |
| Wrap Dosing (Layers) | N/A | Minimum of 5 to 7 continuous, tightly stretched revolutions over the rupture point. |
| Curing Time (Wait Time) | N/A | Strict 10-minute resting period before restarting the engine to allow the adhesive to bond tightly to the EPDM rubber. |
With the exact metrics established, the next critical phase is executing the physical application flawlessly under highly stressful roadside conditions.
The Five-Step Sealing Protocol for Blown Hoses
Execution is everything. To transform a simple roll of heavy-duty tape into a functional automotive component, you must adhere to a strict mechanical protocol. Skipping a single step can result in a secondary blowout, potentially warping your cylinder head or permanently blowing a head gasket.
1. Depressurize and Cool
Never open a hot radiator cap. Allow the engine to cool for a minimum of 30 to 45 minutes. The system pressure must drop to zero. Attempting to tape a hose while it is actively leaking boiling coolant under pressure is mathematically guaranteed to fail and poses a severe physical burn hazard.
2. Clean the Surface Area
Gorilla Tape boasts incredible holding power, but it cannot adhere to a layer of slippery ethylene glycol. Use a shop rag, a spare shirt, or even handfuls of dry dirt and leaves to aggressively wipe down the ruptured area. The rubber must be as dry and oil-free as possible for the heavy adhesive to bite deeply into the pores of the hose.
3. The Anchor Wrap
Begin your wrap at least two to three inches away from the actual tear. Do not place the first piece of tape directly over the active hole. Press the leading edge of the Gorilla Tape firmly into the rubber to create a solid, immovable anchor point. This ensures the structural integrity of the subsequent high-tension layers.
4. The High-Tension Overlap (The 50% Rule)
Pull the tape incredibly tight—stretching it until you feel heavy resistance from the rugged backing. Wrap it tightly around the hose in a spiral motion, ensuring each new revolution covers exactly 50% of the previous layer. This overlapping technique is non-negotiable; it creates an interlocking web of reinforcement that heavily distributes the hydrostatic pressure across a much wider surface area. Apply a minimum of 5 to 7 full revolutions.
5. Replenish Fluid and Monitor
Once the tape is highly secured and allowed to rest for exactly 10 minutes, you must carefully replace the lost coolant. If you do not have extra 50/50 antifreeze in your trunk, use distilled water, or in a desperate emergency, any clean water available. Leave the radiator cap slightly loose (turned just to the first notch) to continuously vent excess pressure, start the engine, and drive cautiously, keeping a constant eye on the dashboard temperature gauge.
Mastering this meticulous protocol empowers you to handle the immediate crisis, but distinguishing between high-grade emergency gear and inferior imitations is crucial for your long-term vehicular preparedness.
Navigating Emergency Adhesives and Progression
Not all tapes are created equal, and your roadside emergency kit must be curated with professional precision. A common mistake motorists make is assuming standard silver duct tape possesses the necessary thermal and tensile properties to act as a Gorilla Tape substitute. The reality is that standard, cheap tape uses a thin, heat-sensitive adhesive that turns into a lubricated sludge when exposed to intense automotive operating temperatures.
To ensure you are fully prepared for a catastrophic coolant loss, you must routinely audit your emergency vehicle supplies. The following progression plan details the exact tiers of emergency repair materials you should ideally carry, highlighting the specific qualities to seek out and the critical flaws to avoid at all costs.
| Material Grade | What to Look For (Crucial Qualities) | What to Avoid (Failure Points) |
|---|---|---|
| Tier 1: Gorilla Tape (Heavy Duty) | Double-thick adhesive, tightly reinforced fabric backing, rugged weather-resistant outer shell. | Avoid storing in direct sunlight inside the car, as extreme cabin heat can prematurely age the adhesive on the roll. |
| Tier 2: Silicone Rescue Tape (Self-Fusing) | Polymerized silicone that chemically fuses to itself without sticky adhesive; rated to 500°F. | Avoid tapes that require an impeccably clean surface to bond; self-fusing tape must stretch significantly to activate properly. |
| Tier 3: Standard Duct Tape (Emergency Only) | Only acceptable for temporarily securing loose plastic body panels, cracked bumpers, or broken mirrors. | Avoid entirely for pressurized fluid leaks; the weak adhesive dissolves almost instantly in contact with hot antifreeze. |
Equipping your vehicle with the correct tier of emergency repair materials guarantees that when a mechanical failure strikes miles from home, you remain in total control of the situation, safely driving away instead of waiting helplessly on the shoulder.